
Video on Lane Codes
What Is a Lane Code?
A Lane Code is an internal or customer-specific identifier for a regular route. Each saved lane stores:
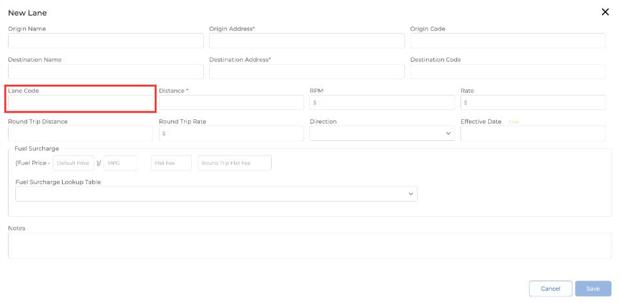
- Origin and destination (with optional names and codes)
- Distance, rate and rate per mile (RPM)
- Optional round trip distance and rate, direction and effective date
- Optional fuel surcharge settings, including a fuel surcharge lookup table
- An optional Lane Code for internal tracking or customer invoicing
How to Create Saved Lanes with Lane Codes
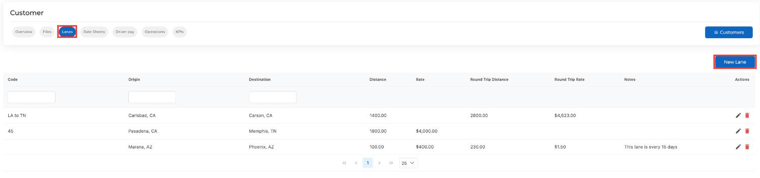
- Go to Customers, find the customer (e.g., FedEx) and click Edit.
- Open the Lanes tab and click New Lane.
- Enter the origin and destination addresses, distance and rate.
- Enter the Lane Code if the customer has a specific identifier for this route (e.g., “NYC-LAX-001”).
- Click Save.
Using Saved Lanes in Dispatch
- Go to Dispatch and click New Load.
- Pick the customer.
- In Step 1, choose the lane from the Customer Lanes dropdown.
Note: typing the lane code by hand won’t fill in the route. Pick the lane from the dropdown.

Once selected, Truckpedia will:
- Fill in the shipper and receiver
- Pull in the saved rate
- Show the lane code on the load
Where Does the Lane Code Appear?
- In the Lane Code field in Step 1 of the load
- On the invoice for that load (helpful for customer references)
When Should I Use Lane Codes?
- Your customer has their own lane identifiers
- You want to standardize routing entries
- You need lane info to show on invoices
For any questions or support, reach out to us at help@truckpedia.io.