
Driver Pay V1. This guide covers Driver Pay V1, which uses the Driver Pay Planning and Driver Pay Settlements tabs. If your account uses Driver Pay V3 (Settlement Planning and Settlements), see How to Create Driver Pay Settlements – V3.
🎥 Watch the step-by-step video on driver pay settlements
What you'll learn
- How to find your drivers' loads for a pay period
- How to review and adjust pay before you settle
- How to approve a settlement, send the pay statement and mark it as paid
- How to fix a mistake
Step 1: Open Driver Pay Planning
- In Truckpedia, click Accounting in the left menu.
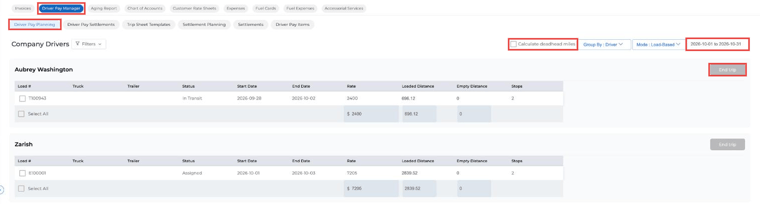
- Click Driver Pay Manager, then Driver Pay Planning.
- Pick the pay period in the date range box at the top right (for example, the 1st to the 15th).
You'll see each driver with the loads they ran in that period, including the rate, loaded distance, empty distance and number of stops.
Step 2: Review and adjust pay
- To include deadhead (empty) miles, check Calculate deadhead miles at the top.
- Use Group By and Mode to change how loads are listed. Load-Based mode is the default. Trip Sheet-Based mode is for drivers paid from trip sheets (see Paying Drivers Using Trip Sheets).
- To change what a driver earns on a load, open the load from Dispatch and go to the Billing tab. There you can edit pay rates and add reimbursements or other payments.
Step 3: End the trip
- Check the loads you want to pay (or Select All).
- Click End trip. This creates a settlement and moves it to Driver Pay Settlements.
Step 4: Review and approve the settlement
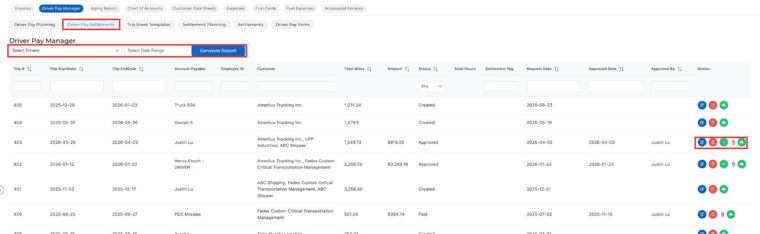
- Open the Driver Pay Settlements tab. You can filter by driver and date range, and click Generate Report to export a summary.
- Click the blue edit icon on the settlement.
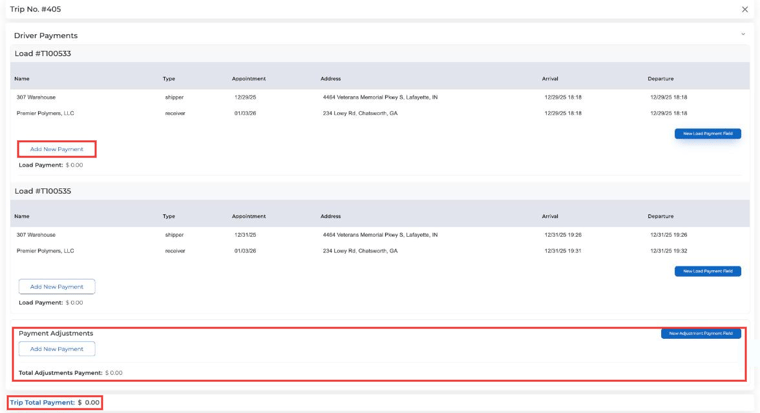
In the settlement you'll see every load with its stops. You can:
- Click Add New Payment under a load to add pay for that load.
- Use Payment Adjustments for things like bonuses, advances or deductions.
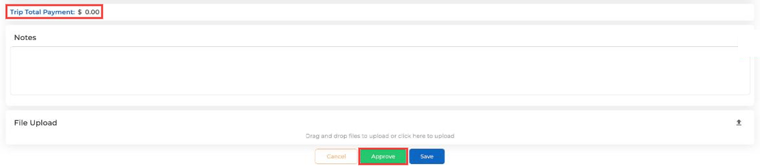
- Check the Trip Total Payment.
At the bottom you can add notes and upload files (for example, receipts). Click Save to keep your changes, or Approve to finalize the settlement.
Step 5: Send the pay statement and mark it as paid
Once a settlement is approved, more icons appear in the Action column:
- Invoice (paperclip): opens the driver's pay statement with the loads, pay items and totals.
- Mark as Paid (green check): click this after you've paid the driver.
- The green cloud icon syncs the settlement to QuickBooks if it's connected. See How to Sync Driver Pay to QBO.
Fixing a mistake
If something's wrong after you end the trip, delete the settlement with the red trash icon. The loads go back to Driver Pay Planning, where you can fix the pay details and end the trip again.
Questions? Email us at help@truckpedia.io.